The Inspiration
On March 19th, a new obsession began when I watched the Liquid Tiles installation by Playmodes and Lightnet GmbH. I was so mesmerized I watched it over and over - really. This was the highest tier LED art I had ever seen. Organic flowing patterns that morph into eachother - so trippy. The light cast on each side? Absolutely beautiful fades across the artwork. High refresh rate + synced to music. Perfection! Truly a spectacle for humanity.
The Liquid Tiles installation that started it all.
I was showing everyone when a friend asked if they could have it on their wall. I thought: what if I could make a personal version? Something smaller, wall-mountable, and customizable. Your own personal million-dollar gallery piece -- but at home!
That's Macaroni. This is exactly what ignites my passion. And I love when a project can name itself, because honestly, the curved LED pieces look exactly like macaronies to me.
What Even Is a Macaroni?
This isn't pasta. Each macaroni is a small curved piece (designing for a white 3D print) that holds 3 LED strips -- one on the concave side, one on the convex side, and one on top. It's mounted so it rotates offset from center, which creates this wonderfully trippy visual effect when dozens of them move together.
Multiply that by 21-44 (for a small piece) or 126 (for a large one like Liquid Tiles), coordinate them with software, and you get flowing geometric patterns enchanted by the magical light of LEDs. It's art, math, and low-key a serious robotic system with distributed motor control.
Testing the geometry in CAD.
Studying the Original
Before my own design, I studied the Playmodes installation. I thought hexagons were the key to understanding the geometry, but then I found a post where they revealed it's a tiling of equilateral triangles.
Of course it would be great to do something totally original, but I'm obsessed with the beauty they've brought to the world and have no qualms with doing it with my own flavor.
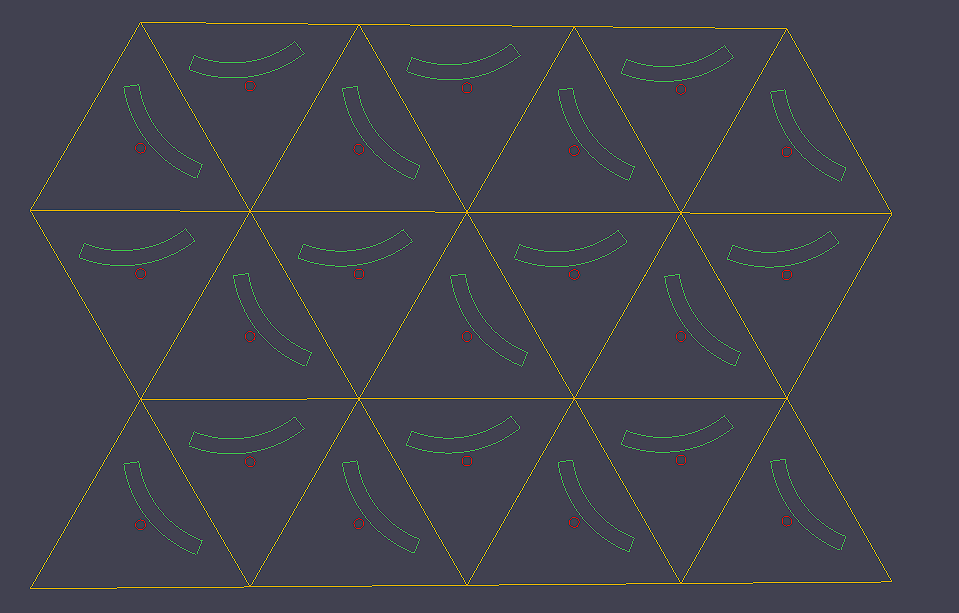
First web simulation of the geometry in 2D.
The Big Design Decisions
Engineering is the discipline of choosing tradeoffs. Especially when I want to scale to 44+ nodes. Here are the most challenging ones I've been facing.
Motors: Brushless Gimbal vs Brushed DC
I've been so torn on this. Each macaroni needs a motor to rotate it - should be easy right?
| TT Motor (Brushed) | Brushless Gimbal | |
|---|---|---|
| Cost | ~$1.50 each | ~$12 each |
| Noise | Whirring/buzzing | Nearly silent |
| Control | Simple H-bridge | FOC algorithm |
The brushed motors are way cheaper and simpler. But - this is an art piece that will be synced to music. Motor noise could completely ruin the experience.
The gimbal motors are silent, precise, and feel premium. They also cost a premium. Additionally, they add firmware complexity with their Field Oriented Control (FOC).
I'm prototyping both to see if the cheap motors can be easily sound-proofed, but to raise the bar on quality - I suspect gimbal motors will win.
Slip Rings vs Wire Wrapping
The LEDs on each macaroni need power and data, but the macaroni rotates. How do you get wires to a spinning thing? Two options:
- Slip rings: electrical contacts that allow infinite rotation. Cool, but $10 each.
- Wire wrapping: just let the wires wrap around. I'll target 6 full rotations in either direction before the wire is fully wrapped.
This is another really hard decision for me, because while I love to not worry about rotations, I also love deleting a part that takes up 30% of BOM cost.
I am prototyping both, so we'll see which one is better.
Other design decisions
Not every decision has been so hard. While they still took consideration, there is a much clearer answer for these. Message me if you want to know more here.
- Controller: Raspberry Pi Zero 2W. I think it's super cool, haven't used it yet. Just needs to host the web server, run Python, and output Modbus.
- Microcontroller: RP2040, because I have experience, debuggers, and an existing LED framework I've built for it.
- Networking: RS485 + Modbus. Should support up to my future max of 128 nodes and have enough data rate if I'm clever. Ethernet was 2nd choice.
- Simulator: In-browser for easy accessibility. Playcanvas for great lighting! Tried Godot and Three.js - weren't the right fit.
- Power: 48V main bus, step down to 12V, 5V, 3.3V at each node
- LEDs: Still debating between WS2812B or APA102 style. Will try both, but start with WS2812B.
The Software Stack
The MVC-style architecture: Pi controller, web simulator, hardware nodes.
The Brain: Raspberry Pi Zero 2 W
The whole installation runs off a single Raspberry Pi Zero 2 W (~$20). It hosts the web interface, runs the pattern engine, and sends commands to all the macaroni nodes over RS485. Having a Linux machine as the controller means I can SSH in, push software updates, and host a local web server -- all on a board the size of a stick of gum.
Pattern Engine (Python, MVC Architecture)
The software follows a Model-View-Controller pattern:
- Model -- Each macaroni is a Python object that knows its position, angle, and LED state.
- View -- The web simulator (and the physical hardware) display the current state.
- Controller -- The pattern engine updates every macaroni each frame, then compiles everything into Modbus commands via pymodbus.
This separation is key. The pattern engine doesn't care whether it's talking to real hardware or a browser simulation. Same code, same patterns, two outputs.
Web Simulator (PlayCanvas)
This is one of the parts I'm most excited about. Instead of iterating on patterns by flashing firmware and staring at hardware, I built a browser-based 3D simulator that renders the entire installation in real-time.
The PlayCanvas-based web simulator -- iterate on patterns without touching hardware.
I went with PlayCanvas over Three.js or a standalone engine like Godot for one reason: lighting. The LED light rays are the whole visual payoff of this project, and PlayCanvas handles real-time lighting beautifully in the browser. Plus, since the Pi hosts the web server, anyone on the local network can pull up the simulator and see the installation's live state.
The long-term vision? A pattern designer in the browser, with a timeline view for syncing effects to music. Think of it like a visual sequencer for kinetic art.
Smart Effects (The Cool Part)
Here's where it gets really interesting. Instead of the Pi telling each macaroni exactly what to do every frame (which would need tons of bandwidth), each macaroni knows its own position in the grid. So the Pi can broadcast a single high-level effect like:
And every macaroni independently calculates when the pulse reaches its location and lights up accordingly. One command, 126 unique responses. This keeps the data rate super low while enabling complex spatial effects.
Same idea works for motor control -- imagine a "magnetic sand" effect where macaronies orient themselves toward an invisible moving magnet. The Pi just sends "magnet sweeps from point A to point B" and each macaroni does the trigonometry locally. Seconds of beautiful coordinated motion from a single tiny message.
Auto-Enumeration
With 48+ identical nodes, each one needs to know which macaroni it is. I'm solving this with a daisy-chain UART scheme: on power-up, every node thinks it's address 0. The first node in the chain gets no UART input, so it knows it's #1. It broadcasts "1" to the next node, which becomes #2, and so on. The whole array self-addresses in seconds.
What's Next
Right now I'm deep in the hardware prototyping phase -- soldering, testing motor control, getting RS485 communication reliable. The software simulator is already working (you can see patterns running in the browser!), so the next big milestone is getting real hardware responding to the same commands.
I'll be posting updates here as things progress. Next up: motor control results, PCB design, and the first multi-node test.
The current state of the workbench. It's a beautiful mess.